Monday, December 19, 2011

Seven Layer Cookies - A Family Favorite


Do you have a cookie you only make at the holidays?
We do!
It is the Seven Layer Cookie!
Why do we only make it at Christmas?
I don't know because it is so easy and so yummy!
There are similar recipes on the sweetened condensed milk cans.
Carnation calls them Outrageous Bars. Eagle Brand calls them Magic Bars.
We call them 7 layer bars because we have added butterscotch chips!

Here is what you need!


Melt the stick of butter and pour into a 9 x 13 pan.
In the words of Paula Deen "butter makes it better"!

Take one package of graham crackers and get a helper to crush them up!
This is a great kid cookie because they can help with every step and they are quick!
Sprinkle graham cracker crumbs over the butter evenly.
Sprinkle a whole bag of chocolate chips!
A whole bag of butterscotch chips!
A cup of pecans! (you can substitute another nut here or leave them out if you have nut allergies in the fam)
A cup to cup and half of coconut!
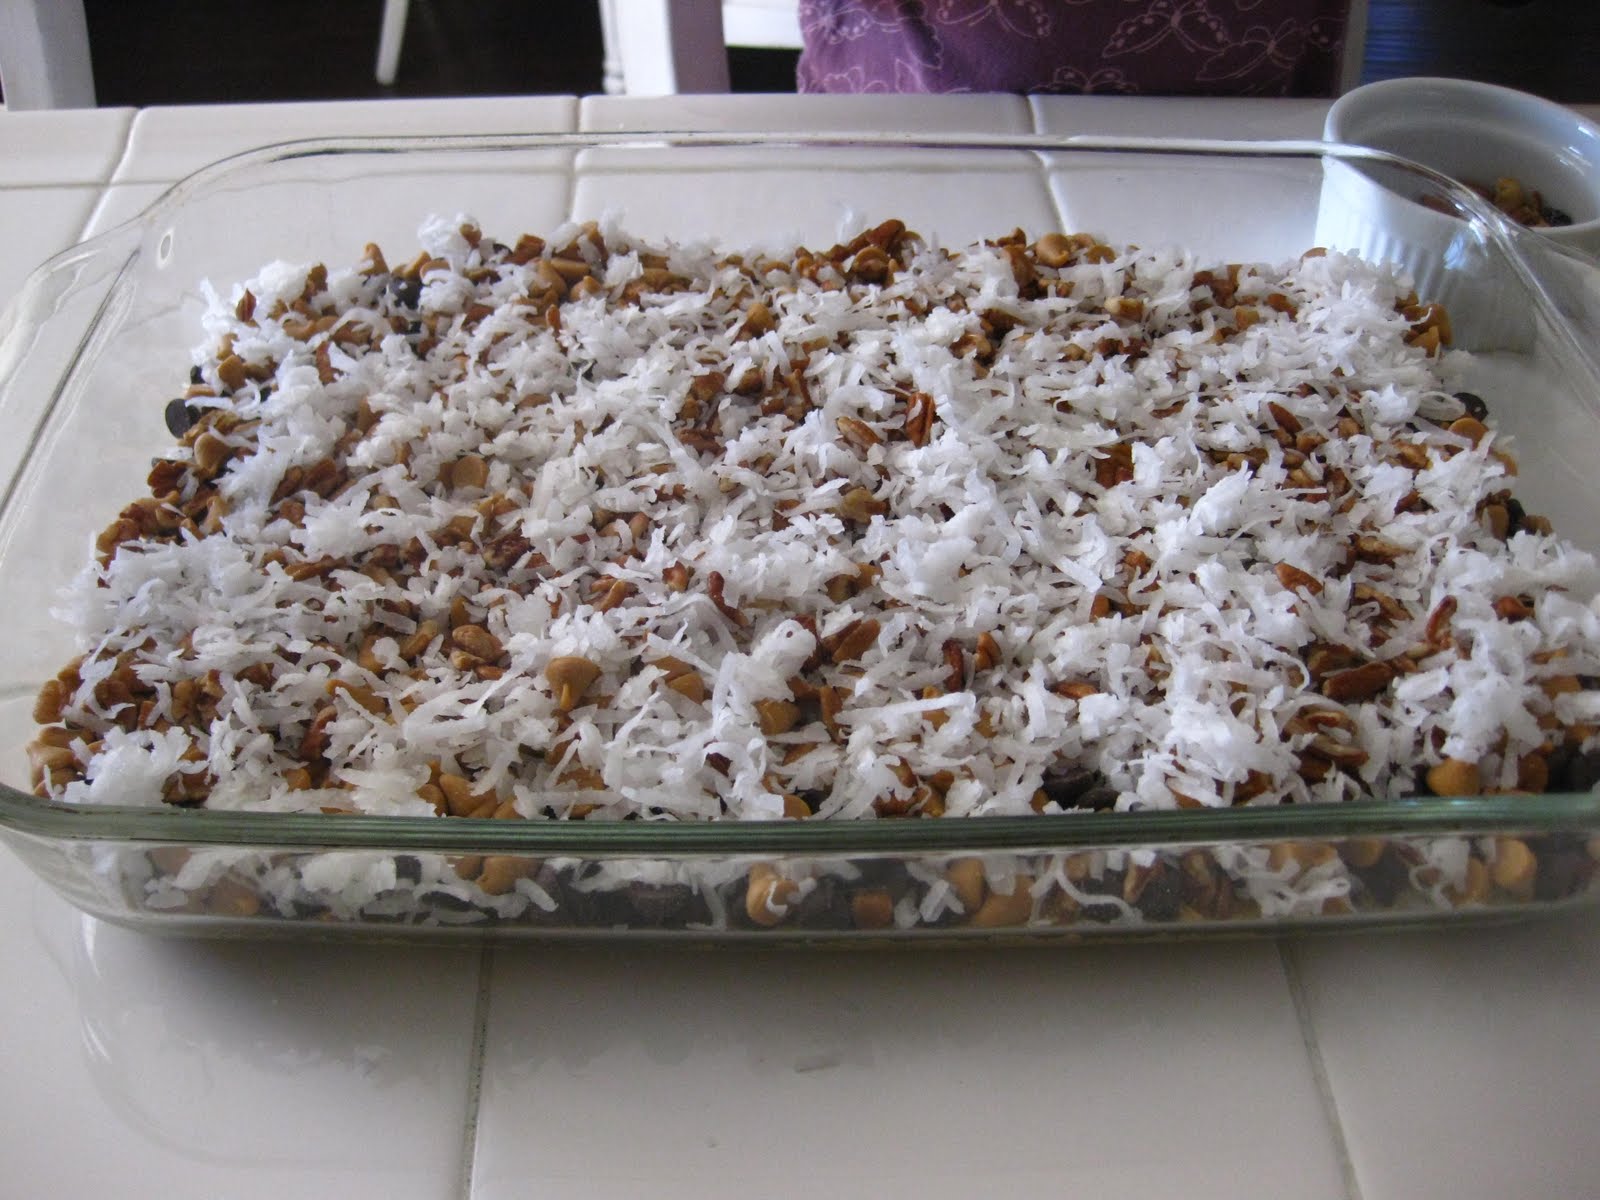
Drizzle one can of sweetened condensed milk evenly over the whole pan.
And Bake for 25 to 30 minutes. If using a glass pan bake at 325, if using a metal pan 350!
Pull them out when they are lightly browned. If you can wait let them cool before cutting,
they will stay together better.
Maybe these will become your family favorite as well!
Happy Holidays!

Recipe:

1 stick butter
1 package graham crackers crushed
1 12 oz package chocolate chips
1- 12 oz package butterscotch chips
1 cup chopped pecans (or nut of your choice)
1 cup coconut
1 14 oz can sweetened condensed milk

Directions:
Melt stick of butter. Sprinkle, and spread crushed graham crackers evenly. Layer chocolate chips, butterscotch chips, chopped pecans, and coconut. Drizzle sweetened condensed milk evenly over the whole thing (this acts like a glue that will hold everything together.)

Bake at 350 in a metal pan, 325 if using a glass pan for 25 to 30 minutes or until lightly brown on the edges. Let cool before cutting.

Enjoy!

Monday, November 7, 2011

Handmade Gift with a Recipe

Maddie made two homemade gifts for her friend.

She made a canvas using the same method she used for boards in her room here.
And she made stuffed mushrooms.
These are always a hit!
I got the recipe from a good friend years ago!
Sofia tried them and loved them last week at the homecoming festivities.
So Maddie made them for Sofia's birthday as well!

Nothing like a hand made gift!
(we did throw in a little starbucks gift card)


Stuffed Mushrooms

12 large mushrooms
1 cube butter (not margarine)
1/2 cup italian breadcrumbs
1 T finely chopped onion
1 T parsley finely chopped (optional)
1 egg slightly beaten
Salt/Pepper

Wipe mushroom cpas clean. Melt 4 tablespoons butter. Dip mushrooms in butter to coat. Mix breadcrumbs, parsley, onion, egg and a little salt and pepper. Fill mushroom caps, melt the remaining butter. Sprinkle with parmesan cheese and drizzle with the remaining butter.

Bake at 350 for 15-20 minutes!

I didn't say it was healthy...Paula Deen would like it because of the stick of butter!!


Sunday, November 6, 2011

This is my old red couch!
We bought it about 10-11 years ago...when I loved red.
It is still in great shape because we really don't sit on it much,
but let me tell you it is comfy.
Once I painted the concrete floor I didn't love the red couch with it.
So I decided it was time to try my hand at slipcovering.
Many people I know I have done slipcover projects.
My friend Shannon at Anythingology slipcovered her couches last year.
My friend Wendy at Simply Brookes slipcovered her old couches years ago.
Her sister-in-law Heather is working on hers she gave me the tip on where to buy the fabric.
Nick of Time -- $3.50 a yard for white denim....this is a good deal.
They sent samples. It was $20 to ship from Pennsylvania to California but still worth it.
I pre-washed it. And it did shrink by about 25%.
Here is the finished product. I need to figure out how to tighten up underneath the curvy arm.
Will probably use a little velcro underneath, and attach it right to the couch.
But, all in all I am happy with the final product.
It was alot of work.
I got some tips from this website.
And opted for no piping to make it a little easier to get the fit right.

Wednesday, October 26, 2011

Pumpkin Latte....the perfect fall coffee.

This is the Pumpkin Latte recipe I found over at Sand and Sisal.
Sand and Sisal


It is super easy.
And much cheaper than Starbucks!

Hope you try it!

Wednesday, October 12, 2011

Pumpkin Scones

Shugary Sweets
Who doesn't love a pumpkin scone from Starbucks during the holidays?
It is one of my favorites, and I have tried to develop my own recipe.
I have done O.K.
But, then I found this recipe from Shugary Sweets. Yum.
I halved the recipe today. Which is a bit challenging when there is no measuring cup for 1/6 of a cup of heavy cream, I just eye balled it the best I could and everything came out fine.
My one critique would be ... I don't know if you NEED two glazes.
I might choose to only do the flavored glaze next time, but it does make it look
kind of pretty with the contrasting glazes.
What is next on my fall treat list?
Pumpkin Lattes....

Monday, August 29, 2011

Lasagna - Pioneer Woman Style

I made the Pioneer Woman's "Best Ever Lasagna"
One word Delicious!!
What makes it unique?
Cottage Cheese instead of Ricotta (my kids like this better not so pungent!)
Breakfast Pork Sausage mixed with Ground Beef...we really liked the sauce.
The actual baking time pretty quick....just enough time to get kitchen cleaned up,
garlic bread and salad prepped!!
Try it you'll like it!!
Also, her new Food TV show debuted this weekend
it was pretty good; fun to see a life on a ranch!

Thursday, August 18, 2011

Another Pioneer Woman Hit!

Day two of trying a new Pioneer Woman Recipe...another keeper.

Here is the photo from her website.
Here is the link to the recipe.

Beef with Snow Peas.
Critique:

All 3 kids liked it!!

It was very easy! Much faster to make than the barbeque yesterday! Much of this prep could be done ahead and then stir fry right before time to eat.

I ended up letting the meat soak in the marinade/sauce for about 45 minutes to time eating with when the kids would be home from their evening activities.

Additions:

Right at the end I tossed in some leftover steamed sliced carrots, just to heat thru. It provided an additional veggie....and the color contrast was very appealing.

Note:
Flank Steak is not as cheap as it used to be, but still cheaper than dinner out for 4 at a Chinese restaurant...even a cheap Chinese restaurant like Panda Express; and I am sure this is healthier.

Tonight...Leftovers!! :)

Happy Cooking.

Wednesday, August 17, 2011

A KEEPER FROM PIONEER WOMAN!

Do you get tired of your standard meals?
Do you get stuck in a rut, looking for new ideas?
I know I do.

Next question ....have you heard of the Pioneer Woman?
She has a great blog, covering homeschooling, photography, and cooking among other things!
She is a funny writer.
she will have her own Food Network show starting this fall,
and they are making a movie about her and her family based on another book she wrote
On top of that she has 4 kids!
She is a busy woman!
So this week before grocery shopping a picked out 4 recipes to try from her blog.
The first up was this one just posted on Monday.
A definite keeper!

I am not going to post any pictures because she has done all the work (see recipe link above)!

I am going to provide you with a critique:

1. Allow enough time for browning the chicken this takes a little longer than you would think. Allow 10-15 minutes per batch. After that the dish comes together pretty quick.

2. BE CAREFUL WITH THE WHISKEY! I have had some bad luck with adding alcohol to dishes and it not cooking off. I reduced the whiskey from 1-1/2 cups, to 1/2 cup and than added a cup of chicken broth. (I could still taste it a little bit....so if you don't want to taste it at all just substitute chicken broth where you see whiskey....it would be cheaper too.)

We will definitely be making this again.
The kids said keeper, everyone left the table stuffed!
A sure sign of a good meal right!?
Let me know if you try it!

Tuesday, July 26, 2011

Giant Bubbles!

So back around 4th of July I wanted to make these giant bubbles.
I had seen it on a blog to do it yourself.
We had one years ago made by Klutz.
I tried to take the easy way out and buy one but they don't make them anymore according to the gal at the store.
Fortunately my friend Heather had a post on how to do it.
And we were off to home depot for supplies. (See Heather's link for how to details)

This took all of 5-10 minutes to put together.
I did hammer tap the screw eyes into the dowels to get them started, than just hand twisted.
Ellie surveying the progress.
Big bubbles here we come!
I have to confess we did not use the glycerine or the distilled water.
I am told the glycerine will help the bubbles stay together better.
But this was entertaining. And almost addictive!
Ellie and will hunt for glycerine today to see if it makes a difference.
We will let you know!!

Monday, July 25, 2011

Scones -- Peach, with Toasted Coconut and Pecans

Do you have a go to breakfast baked good?
For me it is scones.

I have a basic recipe I use from a May 2000 issue of Country Home
and I just change out the mix-ins based on my availability.

Today we tried coconut, pecans and peaches.
We toasted the pecans and coconut on a little cookie sheet in the toaster oven.

Watch closely coconut can quickly go from toasted to burnt.

Whisk together dry ingredients, 2 cups flour, 2 Tbsp. baking powder, 2 Tbsp. sugar.

Cut in 1/3 cup butter (use the real stuff...margarine just isn't the same.)


Gently mix-in your coconut, pecans, and peaches, coat with the flour mixture.
Stir in 3/4 cup milk. Your dough will be thick and sticky.
Turn out onto your counter and just form it
into a circle approximately 7 inches and 3/4 inch thick.

Cut into 8 wedges.


Brush with a little additional milk and sprinkle with a little sugar.
Bake at 425 for 12-15 minutes.
I did a little longer with the peaches because they were sort of a wet addition.
Enjoy!!


Recipe:

2 cups all-purpose flour
1 Tbsp. baking powder
2 Tbsp. sugar
1/3 cup butter
1/2 - 1 cup of mix-ins (suggestions below)
3/4 cups milk

Stir together flour, baking powder, sugar. Cut in the butter with pastry blender, or two knives until mixture resembles coarse peas. Add in desired mix-in. Add 3/4 cup milk and stir just until dough clings together. On a lightly floured surface, pat dough into a 7 inch circle 3/4 inch thick. Cut into 6 to 8 wedges. Place on an ungreased baking sheet. Brush with additional milk and sprinkle with sugar if desired. Bake in a 425 oven for 12 to 15 minutes or until golden.

Other mix-in combos:

Chocolate Chips (kids favorite)
Chocolate Chips, 1Tbsp Orange Zest
Chocolate Chips, Coconut
(do you see a theme?)
Strawberries
Dried Fruit....

You get the idea, use the base recipe and make it your own. You could even go 50/50 on the flour and use 1/2 oats 1/2 flour!!

Enjoy!


Friday, July 22, 2011

Summer Crafts


I really enjoy working on craft projects.
I do seem to be better at helping the kids get their projects going!
Madeline is good at once we get the goods for a project she is typically focused at getting it done, unlike her mother.

And if we have a project for Madeline I try to find something for Ellie to do too.

So we have two projects here. One for Ellie.

Supplies:
One small canvas.
A bag of colorful colored buttons. (we chose one's in the shape of flowers)
Glue (We used tacky glue)


I drew a block letter of her first initial.

Spread the glue around a section at a time.
Then glue on the buttons.
I helped her a little with spatial relationship, filling in some spots with the smaller buttons.

Madeline wanted to make two more boards to go with her original "Sandy Toes" Canvases blogged here.

We found clip art on the internet for a volleyball and a palm tree.
We then took the copies to get them enlarged to the desired size.

She placed it on her light table to trace out the individual shapes.
(You could also trace your projects by placing your paper on a window.)

If you pick something without too much detail it is a little easier.
She used the outline of the whole ball with pink, and placed patterned/colored
pieces for the detail.

Mod podge was the glue of choice.
Then she glued the whole ball to a white canvas.
And finished with a top coat of modge podge over the whole board.
The palm tree was clip art.
She did the island and water free hand.

Here is the finished product.
Inexpensive, cute, and something she did herself with just a few suggestions from mom :)

Wednesday, July 20, 2011

We have had a fun summer....school started today.

In the past few weeks we have been busy.
We made a trip to Virginia Beach to see some good family friends.
We went to Water Country USA (not pictured...water and pictures are a difficult mix.)
The next day Busch Gardens, Williamsburg....

It was very, very hot!
But, the lines were short....the local natives must have stayed home!
Look at Ellie's little cheeks!
No complaints from the kids!
Just riding on rides multiple times!
Then off to the beach!
Cristin and I have been friends for approximately 18 years!
Between us we have 7 kids!
The nice thing is even though they moved away 10 years ago the kids all get along great!
We went to their local cupcake store...one of my favorite pastimes.
We all enjoyed them.
The trip home a little difficult.
We got stranded in the Denver airport due to hail damage.
Our first experience sleeping on the floor....it was a little cold.
But, the kids were troopers even little E....
Home for one day we get ready to go to Palm Springs.
Ben and Madeline are making homemade salsa, and bruchetta from our garden tomatoes!
Yum!
Our view from our condo.
A perfect view of the 16th hole to heckle my brother, dad, husband and son!
A little Marriott boat ride!
It was a good summer vacation!

Here we are at the first day of school already...
Ben a senior, Madeline a "Freshie"
Weird when they drove off to school together this morning....
And little Ellie....off to one more year of preschool!